
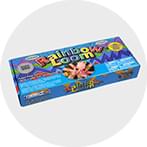
Rainbow Loom Band
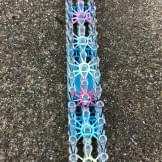
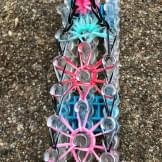
Rainbow Loom® Starburst Mask Headband
Make your own face mask headband using a Rainbow Loom® and take the pressure off your ears. Find easy step-by-step instructions below for how to make a face mask band.

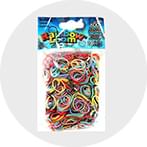
Shop tools & materials you’ll need:
Here’s how to make it:

Step 1
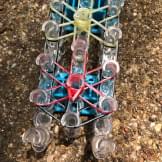
The loom configuration is where the center column (B) is positioned one peg off the left (A) and right (C) columns. Connect two looms together so you have one long loom.
Step 2
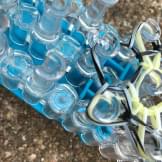
Working in the direction of the red arrow pointing up (or away from you), load loom with border bands and push them down to the bottom of the peg:
Column A- • Add a rubber band from peg B1 to peg A1
- • Add a rubber band from peg A1 to peg A2
- • Add a rubber band from peg A2 to peg A3
- • Continue until A18
- • Add the last rubber band from peg A18 to peg B19
- • Add a rubber band from peg B1 to peg C1
- • Add a rubber band from peg C1 to peg C2
- • Add a rubber band from peg C2 to peg C3
- • Continue until C18
- • Add the last rubber band from peg C18 to peg B19
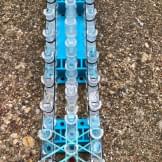
Step 3
To load loom for the starburst:- • Add a rubber band from peg B2 to peg C2; push rubber bands down
- • Add a rubber band from peg B2 to peg C1; push rubber bands down
- • Add a rubber band from peg B2 to peg B1; push rubber bands down
- • Add a rubber band from peg B2 to peg A1; push rubber bands down
- • Add a rubber band from peg B2 to peg A2; push rubber bands down
- • Add a rubber band from peg B2 to peg B3; push rubber bands down
Step 4
Repeat pattern down the loom for nine starbursts.

Step 5
Take a rubber band, twist to a figure 8 and layer over each starburst center peg and the end peg (pegs B2, B4, B6, B8, B10, B12, B14, B16, B18 and B19). Push down.
Step 6
Turn the loom around so the direction of the red arrow is pointing down (or toward you).
Step 7
Take the hook, go through the peg (B19) and get under the rubber bands. Grab the top band (below the cap band) and move it from B19 to B18.

Step 8
With your hook, reach inside peg B18, grab the top rubber band and move it to its corresponding peg (from where the bottom half of the band is wrapped). Continue this around the starburst.
Step 9
Repeat the pattern in Step 8 up the loom for each starburst.
Step 10
Go back down to peg B19 and move the border bands forward, up the pegs to secure the bands.
Step 11
Attach a C-clip to the rubber band on B19.

Step 12
Reach into peg B1 and grab a new rubber band with your hook. While holding one end of the band, pull the other up through the peg. Place the side you are holding onto the hook. Add a C-clip.
Step 13
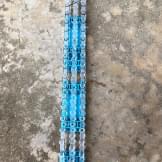
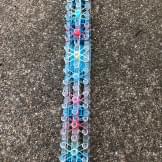
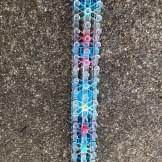
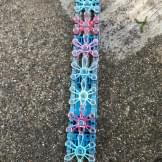
Carefully remove the starburst headband from the loom by pulling and rocking it back and forth.
TIP: Attach the elastics of your face mask with the C-clips at each end of your Rainbow Loom® Starburst Mask Headband.
Templates referenced above follow similar medical materials that are recommended for these items. Medical professionals receiving these items will decide how best to use them.